Creating a first AI video clip sounds simple until the output comes back with the wrong camera angle, strange hands, mismatched text, or a style that does not fit the brand. Most weak first clips are not caused only by the tool. They happen because the prompt, reference image, script, format, and export plan were not ready before generation.
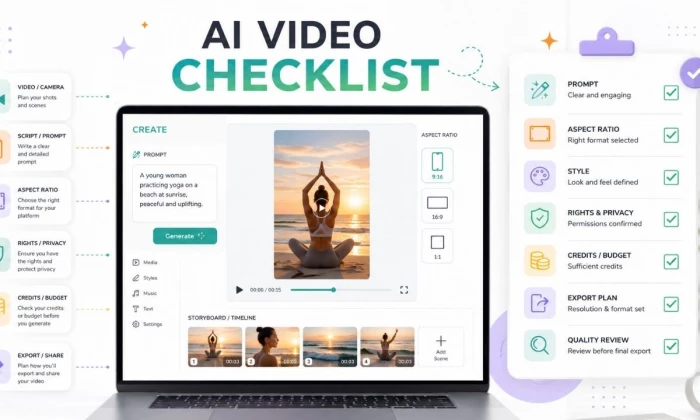
This checklist walks through everything worth preparing before the first generation, from the prompt formula and storyboard to credits, rights, and a quick quality review. The aim is a short, low-cost test clip that shows what a tool can do before any longer video is built.
| Test factor | What to check |
| Prompt accuracy | Did the tool follow subject, scene, action, and style? |
| Motion quality | Is movement smooth or distorted? |
| Text handling | Did the tool create readable text or broken letters? |
| Brand fit | Does the clip match the planned mood and colors? |
| Export quality | Is resolution, watermark, and format usable? |
A few minutes of planning saves credits and rework. The checklist below covers the decisions worth making before the first generation.
| Checklist item | Reason | Done |
| Video goal decided | Keeps the clip focused | ☐ |
| Target audience defined | Helps choose tone and style | ☐ |
| Platform selected | Affects aspect ratio and length | ☐ |
| Script or scene idea ready | Avoids random output | ☐ |
| Aspect ratio chosen | Prevents cropping issues | ☐ |
| Duration planned | Controls credits and pacing | ☐ |
| Style reference prepared | Improves visual consistency | ☐ |
| Brand colors and fonts noted | Keeps the video on-brand | ☐ |
| Credit cost checked | Avoids wasting paid credits | ☐ |
| Commercial rights checked | Prevents usage problems | ☐ |
| Export format checked | Ensures the video fits the platform | ☐ |
| Backup prompt prepared | Makes iteration easier | ☐ |
| Beginners should create a 5 to 10 second test clip first. Longer clips cost more credits and are harder to fix when the prompt is weak. | ||
AI video tools are not all the same. Knowing the main types makes it easier to pick the right one and to prepare the right inputs.
Text-to-Video Tools
These tools generate clips from written prompts. Best for:
Image-to-Video Tools
These tools animate a still image or product photo. Best for:
AI Avatar Video Tools
These tools create talking avatars from scripts. Best for:
AI Video Editing Tools
These tools enhance, extend, remove objects, add captions, or repurpose videos. Best for:
AI Voiceover and Caption Tools
These tools add narration, subtitles, and translations. Best for:
Tool type |
Best for | Beginner difficulty |
Key check before use |
| Text-to-video | Creative clips and B-roll | Medium | Prompt detail and style |
Image-to-video | Product or character motion |
Easy to Medium | Image quality and motion prompt |
Avatar video |
Explainers and training |
Easy | Script, voice, and avatar rights |
| Video editing AI | Improving existing clips | Easy | Export limits and watermark |
| Voice and caption AI |
Narration and subtitles |
Easy | Voice rights and caption accuracy |
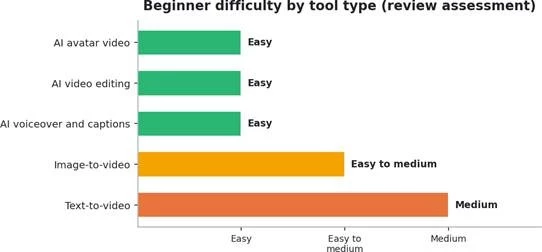
Figure . Relative beginner difficulty by tool type, from this review.
The figure above shows the relative beginner difficulty of each tool type. Avatar, editing, and voiceover tools are usually the easiest to start with, while text-to-video takes the most prompt skill.
The prompt decides much of the output. A vague prompt invites random results, while a structured prompt gives the tool clear direction.
A strong AI video prompt usually includes:
• Subject
• Scene
• Action
• Camera movement
• Style
• Lighting
• Mood
• Background
• Duration
• Aspect ratio
• Motion detail
• Negative instructions
Strong prompt example: Create a 7 second vertical video of a minimalist desk lamp turning on in a cozy evening workspace. Slow camera push in, warm lighting, clean modern desk, soft shadows, realistic product ad style, no text, no logo, no distorted hands, 9:16 aspect ratio.
Weak prompt example: Make a video of a lamp.
The weak version leaves the tool to fill several gaps at random, because it specifies:
• No platform
• No camera movement
• No lighting
• No style
• No duration
• No product context
• No quality control
Not every AI video needs a long script, but every clip needs a clear visual direction. A simple storyboard keeps the test focused.
| Time | Visual | Audio or text | Purpose |
| 0 to 2 sec | Main subject appears | Hook line | Grab attention |
| 2 to 5 sec | Product or action shown | Key benefit | Explain value |
| 5 to 8 sec | Close-up or detail | Short caption | Build interest |
8 to 10 sec |
Final frame | Call to action or logo, if allowed |
End clearly |
Without style direction, AI video tools can produce clips that look random or off brand. Setting a few rules keeps results consistent.
• Brand colors
• Visual mood
• Camera angle
• Realistic or animated style
• Product placement
• Font and text rules
• Logo usage
• Clothing or character consistency
• Background style
• Lighting style
| Style choice | Example |
| Realistic product ad | Clean desk, natural light, shallow depth of field |
| Cinematic scene | Dramatic lighting, camera movement, film style colors |
| Educational video | Clean background, simple graphics, clear captions |
| Social media reel | Fast motion, vertical format, bold visual hook |
| Corporate explainer | Neutral background, avatar, clear voiceover |
| Animated style | Simplified characters, bright colors, playful motion |
AI video generation can use credits quickly, especially at higher resolution or longer durations. A few checks prevent wasted spend.
| Pricing item | Check before creating |
| Free credits | Enough for a test clip? |
| Clip duration | Cost per second or per generation? |
| Resolution | Does HD or 4K cost more? |
| Watermark | Removed only on a paid plan? |
| Failed generations | Are credits refunded? |
This step is not optional. AI video can create legal, privacy, and trust problems when consent, rights, and platform rules are ignored.
| Risk | Safer practice |
| Using someone's face | Get consent or use licensed assets |
| Uploading client files | Check privacy and data retention |
| Using brand logos | Use only with permission |
| Creating realistic people | Avoid deception and impersonation |
| Commercial ads | Check rights and plan terms |
| AI voiceover | Use licensed or allowed voices |
| Public posting | Follow platform synthetic media rules |
The first clip should be reviewed before it goes anywhere. A quick pass catches the issues AI video is known for.
| Quality check | Pass or fail |
| Subject looks correct | ☐ |
| Motion is smooth | ☐ |
| No distorted face or hands | ☐ |
| Text is readable or removed | ☐ |
| Brand style matches | ☐ |
| Aspect ratio fits the platform | ☐ |
| No unwanted logo or watermark | ☐ |
| Audio is synced | ☐ |
| Captions are accurate | ☐ |
| Export quality is acceptable | ☐ |
Most weak first clips come from a short list of avoidable mistakes.
| Mistake | Result | Better approach |
Using a vague prompt |
Random output | Add subject, action, style, camera, and duration |
| Starting with long clips | More credit waste | Test 5 to 10 seconds first |
| Ignoring aspect ratio | Cropped video | Choose the platform format first |
| Adding too many subjects | Confusing scene | Keep one clear focus |
No single tool is best for everyone. The categories below pair common goals with examples worth comparing.
| Use case | Tool category | Examples to compare |
| Cinematic AI clips | Text-to-video | Runway, Kling AI, Luma, Pika |
| Product motion | Image-to-video | Runway, Pika, Kling AI, Luma |
| Talking avatar videos | Avatar video | HeyGen, Synthesia, Akool AI |
| Social media reels | AI editing or video creation | CapCut, Canva, InVideo |
| Repurposing long videos | Clip generation | OpusClip, Descript |
| Training videos | Avatar and script tools | Synthesia, HeyGen |
Video ads | AI video and marketing tools |
Akool, Creatify, InVideo |
| Voiceover and captions | Audio and caption AI | Descript, CapCut, Canva |
| Always verify current pricing, export rights, watermark rules, and commercial-use terms before choosing a tool. Features and plans change often. | ||
Shorter prompts are not always better. A bare prompt often produces random results, while a structured prompt with scene, motion, lighting, duration, and aspect ratio gives the tool a far better chance of producing something usable on the first try.
AI Video Generator Checklist by Content Type
| Video type | Best starting point | What to check first |
| Instagram Reel | 9:16 short clip | Hook, motion, captions |
| YouTube Short | 9:16 vertical video | First 2 seconds, subtitles, pacing |
| Product ad | Image-to-video or text-to-video | Product shape, lighting, brand fit |
| Training video | Avatar video | Script, voice rights, avatar license |
| Cinematic B-roll | Text-to-video | Camera movement, mood, realism |
| Explainer video | Avatar or editing tool | Script clarity, captions, export quality |
A last pass before generating keeps the first clip cheap, on-brand, and safe.
| Final check | Done |
| Goal is clear | ☐ |
| Audience is defined | ☐ |
| Platform is chosen | ☐ |
| Aspect ratio is selected | ☐ |
| Duration is planned | ☐ |
The first AI video clip is best treated as a test, not the finished product. Preparing the goal, audience, prompt, script, style, duration, aspect ratio, credits, rights, and export plan before generating turns guesswork into a focused experiment.
The safest approach is to start small. A 5 to 10 second test clip reveals whether the tool understands the prompt, handles motion cleanly, and exports in the right format. Once that test works, longer videos follow with fewer surprises and less wasted credit. Used this way, an AI video generator becomes a reliable part of a creator workflow rather than a source of expensive, off-brand clips.
Share your thoughts about this article.
Be the first to post a comment!
Choosing an AI tool sounds simple until the options start looking the same. One...
Deepak Mehra3 days ago
Gauth AI tends to matter most at the exact moment it stops cooperating. A proble...
Mighva Verma4 days ago
Before You Start: What Remaker AI Can Actually DoMost disappointing AI edits fai...
Sakshi Dhingra2 weeks ago

Content pillar" is one of the most confusingly used terms in marketing because i...
Deepak Mehra3 weeks ago

The Power of Content AuditsA systematic review of every piece of content you own...
Sakshi Dhingra1 month ago
Introduction: Why Sales Automation Is No Longer OptionalToday’s B2B sales enviro...
Michael Hicklen4 months ago