The first time I opened PixVerse AI, I typed one lazy line, pressed generate, and got back a blurry clip that looked nothing like the scene in my head. That gap between what you picture and what the model actually renders is the whole lesson of learning this tool. On the surface PixVerse AI feels simple: a prompt box, a generate button, a download link. The result, though, depends almost entirely on the prompt you write, the source image you feed it, the style you choose, the motion settings you set, and the editing you do afterward.
So this is not a tour of buttons. It is a practical walkthrough of how to use PixVerse AI to get better looking videos with fewer failed generations, which is what matters when your credits and your time are limited. You will set up an account, make your first text-to-video and image-to-video clips, learn a prompt formula that travels across every style, and pick up the small habits that separate a usable clip from a wasted render.
If you only read one section before diving in, read this one. It frames what the tool is good at and where your expectations should sit.
| Feature | Purpose | Best for | Beginner tip |
| Text-to-video | Turns a written prompt into a moving clip | Concepts, scenes, and ideas with no source image | Describe one clear moment, not a whole story |
| Image-to-video | Adds motion to a still image you upload | Portraits, products, anime art, and thumbnails | Use a sharp, well-lit image for cleaner motion |
| Prompt box | Where you tell the model what to create | Steering subject, style, and camera movement | Write in the order of the prompt formula below |
| Style options | Sets the visual look of the output | Realistic, cinematic, anime, and stylized clips | Pick the style first, then write to match it |
| Motion control | Directs camera movement and subject motion | Cinematic pushes, pans, and gentle action | Ask for one motion, not five at once |
| Aspect ratio | Sets the frame shape for the platform | Reels, Shorts, square posts, and wide video | Choose the ratio before you generate, not after |
| Video length | Controls clip duration where available | Quick social clips and short cinematic shots | Shorter clips usually look more stable |
| Export / download | Saves the finished clip to your device | Posting, editing, or stitching clips together | Check watermark and quality settings first |
Getting in takes a couple of minutes, and a slow first look saves you wasted credits later.
1. Open the official tool. Go to the official PixVerse site, or install the mobile app from the Google Play listing or the App Store.
2. Sign up or log in, usually with an email or a Google account.
3. Check your free credits or trial limits so you know how many generations you can run before paying.
4. Explore the dashboard. Find the create button, your generation history, and your account or billing area.
5. Locate the two main entry points: text-to-video and image-to-video.
6. Review the available models, styles, aspect ratios, and settings. PixVerse offers a general-purpose model line and a cinematic-focused line, plus access to some external models, so the menu may look fuller than other tools.
7. Check pricing and usage limits before you generate in bulk, so a long session does not drain your credits unexpectedly.
Confirm these on the official site before you publish anything
|
Feature names and plan limits move quickly with AI video tools, so treat any number you read in a guide as a starting point and verify the current details yourself.
Text-to-video is the fastest way to see what the tool can do. Here is the full path from a blank prompt box to a saved clip.
1. Open the text-to-video tool from the dashboard.
2. Choose the video style or model that matches your goal, for example realistic, cinematic, or anime.
3. Write a clear prompt that names the subject, the setting, and the look you want.
4. Select the aspect ratio for where the clip will be posted.
5. Choose the video length if the option is available.
6. Adjust the motion or camera movement if your model supports it.
7. Generate the video and wait for the render to finish.
8. Review the result at full screen, not as a tiny thumbnail.
9. Regenerate or, better, refine the prompt if the clip misses your idea.
10. Export the final video once it matches what you pictured.
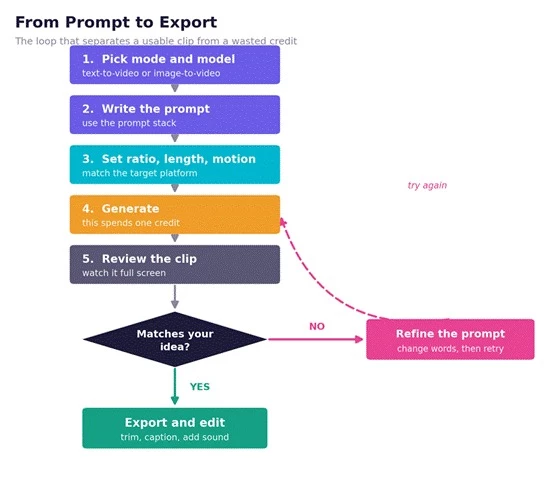
The generation loop: most beginner frustration comes from skipping the refine step and just hitting generate again.
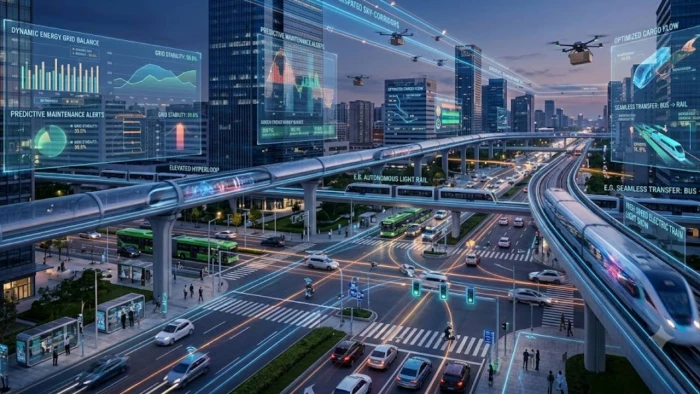
| “Create a cinematic shot of a futuristic city street at night, neon lights reflecting on wet roads, slow camera movement, realistic style, detailed atmosphere, no text on screen.” |
That prompt works because it gives the model everything it needs and nothing it can misread:
• Clear subject: a futuristic city street.
• Clear environment: night, wet roads, neon reflections.
• Visual style: realistic and cinematic.
• Camera direction: slow movement, so the motion feels intentional.
• Mood: a detailed, atmospheric scene.
• Negative instruction: no text on screen, which prevents garbled lettering.

Image-to-video is where beginners often get their best early results, because a strong source image does half the work. You hand the model a still and tell it how to move.
• Upload a clear image. Sharp, well-lit, and uncluttered photos animate far more cleanly than busy or low-resolution ones.
• Use a high-quality source. Soft or pixelated inputs tend to warp once motion is applied.
• Add motion instructions. Describe the camera move and any subtle subject movement you want.
• Keep the prompt consistent with the image. Describe what is already there, then add motion, rather than asking for a different scene.
• Avoid extreme changes. Requests that fight the original (new faces, new backgrounds, large pose shifts) often distort the subject.
• Match it to the right jobs. Image-to-video shines for portraits, product shots, anime images, thumbnails, concept art, and social clips.
• “Add slow cinematic camera movement, soft wind in the hair, natural lighting, realistic motion.”
• “Animate this product with a smooth rotating camera movement, clean studio background, premium commercial style.”
• “Turn this anime character image into a short dynamic scene with glowing background particles and subtle facial movement.”
Most failed clips trace back to a vague prompt. This formula gives you a repeatable order to write in, so you stop forgetting the parts that matter:
Subject + Action + Scene + Style + Camera Movement + Lighting + Mood + Quality Details + Negative Instructions
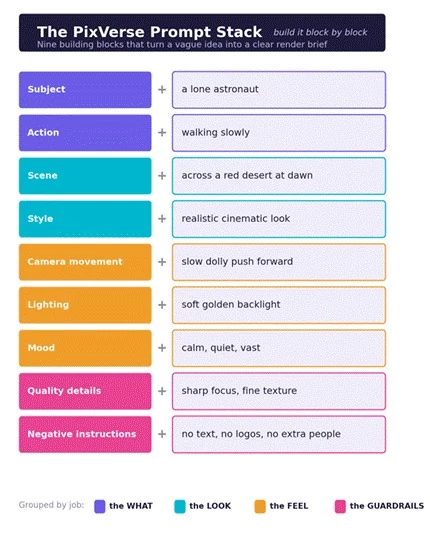
Build a prompt block by block. You do not need every block every time, but the order keeps your instructions clean.
The same skeleton flexes across very different looks:
• Cinematic video: A vintage car driving along a coastal road, golden hour, realistic cinematic style, slow tracking shot from the side, warm sunlight, nostalgic mood, sharp detail, no text.
• Anime video: A young swordsman standing on a cliff, wind moving the cape, anime style, slow camera pull back, dramatic rim light, heroic mood, crisp linework, no watermark.
• Product video: A glass perfume bottle on a marble surface, gentle rotating camera, clean studio lighting, premium commercial style, soft reflections, elegant mood, high detail, no logos.
• Fantasy scene: A floating island with waterfalls above the clouds, slow drone-style flyover, painterly fantasy style, soft volumetric light, awe-filled mood, rich detail, no text on screen.
• Social media short: A cup of coffee with rising steam on a cozy desk, subtle zoom in, warm realistic style, soft morning light, calm mood, clean and sharp, vertical framing, no captions.
• Character motion: A close-up of a smiling woman turning her head slightly toward the camera, soft natural light, realistic style, gentle motion, friendly mood, detailed skin texture, no distortion.
| Use case | Prompt structure | Example prompt | Editing tip |
| Cinematic | Subject, scene, cinematic style, slow camera, lighting, mood | A lone lighthouse on a stormy coast at dusk, cinematic style, slow push in, moody blue light, no text | Add a subtle color grade and ambient sound |
| Anime | Character, action, anime style, camera move, rim light, mood | A girl running through falling cherry blossoms, anime style, side tracking shot, soft pink light | Add light music and a clean title card |
| Product | Product, surface, rotating camera, studio light, premium look | A smartwatch on a dark stand, slow rotation, studio lighting, premium style, no logos | Overlay your brand text in your editor, not the prompt |
| Social short | Subject, gentle motion, warm style, vertical framing | Latte art being poured, top-down view, soft zoom, warm style, vertical framing | Trim to the strongest 3 seconds and add captions |
The single most common beginner mistake is generating in the wrong shape, then cropping later and losing half the frame. Set the aspect ratio first, based on where the clip will live.
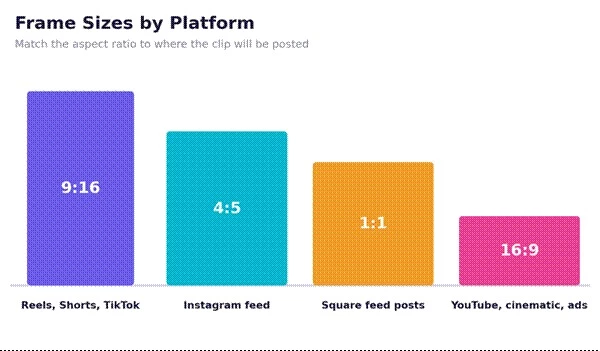
Pick the frame before you generate. Cropping a wide clip into a vertical one rarely ends well.
| Video type | Aspect ratio | Prompt style | Motion level | Best use |
| YouTube Shorts | 9:16 | Punchy, single subject | Medium | Hooks and faceless clips |
| Instagram Reels | 9:16 or 4:5 | Trendy, warm, clean | Medium | Lifestyle and product teasers |
| TikTok videos | 9:16 | Bold, fast, eye-catching | Medium to high | Trend-led creative clips |
| Cinematic clips | 16:9 | Detailed, atmospheric | Low to medium | Showreels and intros |
| Anime scenes | 16:9 or 9:16 | Stylized, expressive | Medium | Character moments and edits |
| Product videos | 1:1 or 4:5 | Clean, premium, studio | Low | Ads and catalog clips |
| Storytelling videos | 16:9 | Descriptive, scene-led | Low to medium | Narrated shorts and explainers |
| Music video visuals | 16:9 or 9:16 | Abstract, vivid, rhythmic | High | Loops and background visuals |
| Ad creatives | 1:1, 4:5, or 9:16 | Sharp, benefit-led | Low to medium | Paid social and promos |
Almost every wasted credit comes from one of these. Fixing them early makes the tool feel far more reliable.
• Writing vague prompts. “Make a cool video” gives the model nothing to aim at. Name the subject, scene, and style.
• Asking for too many actions at once. One clip should capture one moment. Stacking three or four actions confuses the motion.
• Using low-quality images. Blurry or cluttered source images warp once animated. Start clean.
• Ignoring aspect ratio. Generating wide and posting vertical means heavy cropping. Set the ratio first.
• Expecting perfect character consistency. The same character can shift between clips. Plan for it rather than fighting it.
• Overusing cinematic words without direction. Stacking “epic, cinematic, masterpiece” does little. Specific camera and lighting cues do more.
• Skipping camera movement. Without a motion cue, clips can feel flat. Name a simple move like a slow push in.
• Forgetting negative prompts. Add lines like “no text, no logos, no extra limbs” to head off common errors.
• Regenerating without changing the prompt. Hitting generate again often returns a similar miss. Change the words first.
• Publishing without editing or checking. Most clips improve with a quick trim, caption, and sound pass before they go live.
Copy any of these, swap in your own subject, and adjust the style. They are written in the prompt-formula order so they hold up across models.
1. Cinematic city scene: A rain-soaked downtown street at night, neon signs reflecting in puddles, realistic cinematic style, slow forward dolly, moody lighting, no text on screen.
2. Anime character scene: A determined teenage hero on a rooftop at sunset, wind in the hair, anime style, slow camera pan, warm rim light, dramatic mood, crisp lines.
3. Product commercial clip: A sleek pair of headphones rotating on a dark pedestal, clean studio lighting, premium commercial style, soft reflections, high detail, no logos.
4. Fantasy landscape: A glowing forest with floating lights and a distant waterfall, slow drifting camera, painterly fantasy style, soft volumetric light, magical mood, rich detail.
5. AI fashion video: A model walking toward the camera in a flowing coat, studio runway, realistic style, smooth tracking shot, soft key light, confident mood, sharp fabric detail.
6. Futuristic robot scene: A humanoid robot powering on in a high-tech lab, blue accent lighting, realistic sci-fi style, slow orbit camera, tense mood, fine metallic detail, no text.
7. Travel-style visual: A coastal cliff path at golden hour, gentle aerial flyover, realistic style, warm sunlight, peaceful mood, detailed landscape, vertical framing.
8. Food video concept: A fresh pizza being pulled apart with melting cheese, top-down view, warm realistic style, soft natural light, appetizing mood, close detail.
9. Horror mood clip: An empty hallway with a flickering light at the far end, slow creeping camera, desaturated style, cold dim light, unsettling mood, subtle fog, no text.
10. Motivational reel background: Sunrise over a misty mountain range, slow upward camera tilt, realistic style, golden light breaking through clouds, uplifting mood, vertical framing.
You rarely need a longer prompt. You need a clearer one. Watch what happens when a weak request gets specific.
Weak prompt: “Make a dog video.”
Better prompt: “Create a realistic golden retriever running through a green park during golden hour, soft sunlight, slow-motion camera, joyful mood, natural movement.”
The second version names the breed, the setting, the time of day, the camera behavior, and the mood, so the model has a clear target instead of a guess.
| Weak prompt | Improved prompt | Reason it works better |
| A car video | A red sports car driving along a cliffside road at sunset, realistic style, side tracking shot, warm light, no text | Adds subject detail, setting, camera, and a negative cue |
| A city at night | A quiet Tokyo alley at night, neon signs, light rain, cinematic style, slow forward camera, moody tone | Specifies place, atmosphere, style, and motion |
| A nice nature clip | A misty pine forest at dawn, soft sun rays through trees, realistic style, gentle drifting camera, calm mood | Replaces vague praise with concrete visual cues |
| A product shot | A white sneaker rotating on a marble block, clean studio light, premium style, soft shadow, no logos | Defines surface, lighting, look, and a guardrail |
| An anime girl | An anime girl with short blue hair smiling softly, falling petals, anime style, slow zoom in, warm light | Pins down appearance, motion, and mood for consistency |
Once the basics click, the tool slots into real content workflows. A few of the most practical:
• Faceless video content. Build clips for niches where you never show your face, from explainers to ambient channels.
• YouTube Shorts backgrounds. Generate moving visuals to sit behind voiceover or text hooks.
• Instagram Reels visuals. Create scroll-stopping b-roll for lifestyle, travel, and product posts.
• TikTok creative clips. Produce bold, stylized shots that fit fast-moving trends.
• Product teaser videos. Animate a product still into a short, premium-looking reveal.
• Music visuals. Loop abstract or cinematic scenes for tracks and audio posts.
• Storytelling scenes. Stitch several clips into a short narrated sequence.
• AI avatar-style clips. Create character-led moments for intros and skits.
• Concept videos for brands. Mock up a visual direction before committing to a full shoot.
• Mood boards for video campaigns. Generate reference clips to align a team on tone and look.
A fair guide names the rough edges. None of these are dealbreakers, but knowing them up front saves disappointment.
• Short clip length limits storytelling. You will usually work in short shots and stitch them together for anything longer.
• Character consistency can vary. Keeping the exact same face across multiple clips is still hard.
• Hands, faces, text, and complex motion can break. Fine detail and busy movement are where AI video still slips.
• Results may need multiple generations. Expect to refine and rerun, especially while you are learning.
• Free plans have limits. Credits, length, and quality are often capped until you upgrade, so check the current tiers.
• Commercial terms must be checked. Before using clips for clients or monetized content, confirm the rights on the official site.
• Output often needs editing. A trim, caption, and sound pass in another tool usually lifts the final result.
• Not every clip lands first try. Treat early misses as part of the process, not a sign you are doing it wrong.
This is a quick orientation, not a full comparison. Every tool below changes fast, so check current features and free tiers yourself before choosing.
| Tool | Better for | Main strength | Main limitation compared with PixVerse AI |
| Runway | Pro-level control and editing | Deep creative tools and editing suite | Steeper learning curve and cost for a first-timer |
| Pika | Quick, playful stylized clips | Fast, approachable, effect-driven | Fewer fine-grained cinematic camera controls |
| Kling AI | Longer, highly realistic motion | Strong realism and motion length | Access and region availability can vary |
| Luma AI | Smooth, natural camera motion | Fluid realistic movement | Fewer anime and stylized presets |
| InVideo AI | Full faceless videos with voiceover | Script, voice, and stock in one flow | More template assembly than generative shots |
Generation is the first half. A short edit is what makes a clip feel finished and on-brand. A simple post-pass usually covers:
• Trimming. Cut to the strongest few seconds and drop weak frames.
• Captions. Add on-screen text for sound-off viewing on social.
• Music. Set tone with a track or ambient bed.
• Voiceover. Layer narration for explainers and stories.
• Color correction. Even out tone and lift contrast for a polished look.
• Branding. Add your logo or handle as an overlay, not in the prompt.
• Text overlays. Reinforce a hook or a call to action.
• Transitions. Smooth the cut between two AI clips.
• Upscaling. Sharpen output if you need a larger or cleaner frame.
• Combining clips. Stitch several short generations into one short story.
Any editor works for this. Common choices include CapCut, VEED.io, and Canva for fast social edits, or Premiere Pro and DaVinci Resolve for finer control. They are examples, not requirements.
Run through this quick pass before you hit download. It catches the issues that get clips taken down or reshot.
After enough sessions to stop counting, here is my honest take on how to use PixVerse AI well. It is a genuinely useful tool for beginners who want to make short AI videos quickly, especially for social media, cinematic clips, anime visuals, and image-to-video experiments. The interface gets out of your way, and the first usable clip comes faster than you might expect.
The catch is the part nobody can skip. The best results come from clear prompts, strong source images, a willingness to refine instead of blindly regenerate, and a short edit afterward. Treat it like a magic button and you will burn credits on near-misses. Treat it like a creative assistant that needs clear direction, and it becomes far more powerful than the price suggests. Start small, keep the prompt formula handy, and let your first few misses teach you the tool.
Is PixVerse AI free to use?
PixVerse AI typically offers a free tier with limited credits, along with paid plans that raise limits and unlock more features. Free usage often comes with caps on length, quality, or watermarking, so check the current pricing on the official site before you rely on it.
Can PixVerse AI create videos from text?
Yes. Text-to-video is one of its two core modes. You describe a scene in the prompt box, choose a style and aspect ratio, and the tool renders a short clip from your words.
Can PixVerse AI animate images?
Yes. Image-to-video lets you upload a still and add motion such as camera movement or subtle subject animation. A sharp, clean source image gives the smoothest result.
Is PixVerse AI good for YouTube Shorts?
It is a strong fit. Generate in a 9:16 vertical ratio, keep clips short and punchy, and use them as hooks or faceless backgrounds. A quick edit with captions and sound makes them feel finished.
Can PixVerse AI create anime videos?
Yes. It supports anime and other stylized looks for both text-to-video and image-to-video. Name the anime style in your prompt and add a clear camera move for a more dynamic scene.
Share your thoughts about this article.
Be the first to post a comment!
Quick answerTo rank in Google AI Overviews: first get into the organic top 10 (7...
Deepak Mehra12 hours ago
Quick picks (if you just want the answer)Best overall: GPT Image 2 (ChatGPT) — #...
Nitin12 hours ago

In 2026, the debate over AI coding assistants has effectively collapsed into a t...
Harpreet Singh14 hours ago
Artificial intelligence is beginning to influence entire transportation networks...
Deepak Mehra2 days ago

Quick answerBlackbox AI is an AI coding assistant used for generating code, debu...
Harpreet Singh3 days ago

I did not set out to write a warning. I set out to find a cheap, fast tool that...
Nitin4 days ago