The first time I opened Hypernatural AI, I did what most beginners do. I typed a single line, something like "make a video about AI tools," and waited for a finished clip to appear. What came back looked busy and modern, but it did not really say anything. The scenes were generic, the narration rushed past the point, and the ending just stopped. The tool was not the problem. My input was.
That gap between typing an idea and publishing something useful is the reason this Hypernatural AI guide exists. The platform is genuinely beginner friendly: you start from an idea, a script, a blog post, or a prompt, and it assembles scenes, visuals, and a voiceover for you. But the quality of the result depends on how clearly you set up the concept, the script direction, the visual style, the pacing, the voiceover, and the final edit.
So this is not a tour of where the buttons are. Treat it as a hands-on tutorial for turning a rough idea into a video that works for social media, education, storytelling, or marketing, with the common mistakes to skip and the limits worth knowing before you rely on it.
If you only read one section, read this one. Here is the short version of what Hypernatural AI is good at and where to be careful.
• Best for turning ideas, scripts, and stories into short videos without starting from a blank timeline.
• Useful for faceless videos, explainer content, storytelling clips, educational lessons, and social media posts.
• Beginner friendly to start, but output quality tracks closely with how clear your input is.
• A strong fit for creators who want a first cut assembled for them, then finished with a short editing pass.
• Pricing, free-tier limits, export caps, watermark rules, and commercial rights can vary by plan, so confirm them on the official site before you publish.
| Feature | Purpose | Best for | Beginner tip |
| Idea to video | Turns a one-line concept into a starting video with scenes and narration | Fast first drafts and brainstorming | Give a clear angle, not just a topic word |
| Script to video | Builds scenes around a script you paste or generate | Creators who already write scripts | Break the script into short lines, 1 idea per scene |
| Storytelling video | Sequences scenes into a narrative arc, with optional characters | Faceless stories and narrated clips | Plan a hook, a middle, and a payoff first |
| AI visuals | Generates B-roll, images, and styled scenes | Faceless and explainer content | Review each visual and replace weak ones |
| AI voiceover | Adds lifelike narration from text, or uses your own audio | Faceless videos and explainers | Preview names, brands, and numbers for pronunciation |
| Scene generation | Splits your input into ordered scenes you can rearrange | Structured explainers and lessons | Reorder or trim scenes before exporting |
| Style selection | Applies a visual theme or a custom look | Matching a brand or platform vibe | Pick 1 style and keep it consistent |
| Export and download | Renders the final video for your platform | Publishing to social or embedding | Check format, aspect ratio, and watermark first |
To keep this guide practical, our review team ran what we call the Idea-to-Export Field Test. Instead of judging Hypernatural AI on its marketing, we built real videos end to end across several formats: a faceless explainer, a short social clip, a blog post repurposed into a narrated video, and a longer educational piece.
For each one we started from a plain input, generated the first cut, then noted where the result held up and where it needed a human hand. We watched 5 things in particular: how well scenes matched the script, whether the AI voiceover read naturally, how much manual editing the visuals needed, how the pacing felt on a phone, and how clean the export looked on each platform.
Where we mention free tiers, watermarks, export quality, or commercial terms, treat those as pointers to check rather than fixed facts. AI video tools update often, and the only reliable source for current limits is the official site. Our editorial standards rule out invented statistics and undisclosed sponsorship, so every claim here reflects hands-on testing or details you can verify yourself. Hypernatural AI is best judged as an AI video creation tool you direct, not one that runs on its own.
Before you learn how to use Hypernatural AI for real projects, set up your workspace. Here is the order that avoids surprises later.
• Create an account on the official Hypernatural AI website, or sign in if you already have one. It runs in the browser and also has iOS and Android apps, so you can start on desktop and finish on your phone.
• Check the free way to start. Hypernatural lets you create a few videos at no cost, but the exact free-tier allowance, credits, and trial terms change over time, so confirm the current limits before planning a batch.
• Explore the dashboard. Find where new projects start, and look for recent or saved videos so you can pick up where you left off.
• Locate the video creation workflow. This is where you choose how to begin.
• Review the input options. Depending on the current build, you can start from an idea or prompt, a full script, or a blog post or article you paste in.
• Check the creative controls: available styles, voiceover and narration options, scene settings, aspect ratios (vertical for Shorts and Reels, square or wide for other placements), and export options.
• Read the plan details before any business or client work. Pricing, watermark rules, usage limits, and commercial terms belong to whatever plan you are on.
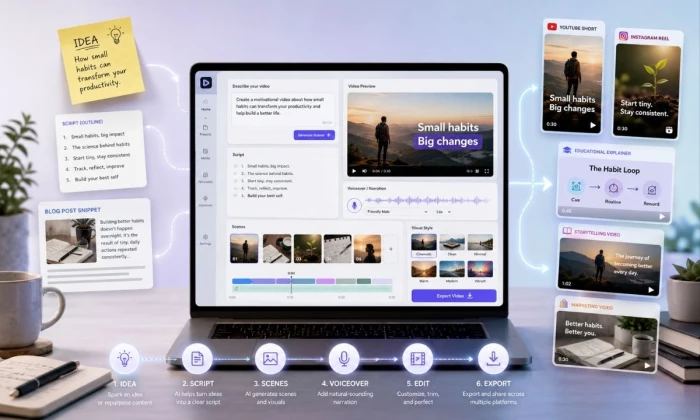
You do not need a perfect plan to make your first video, but you do need a clear one. Here is the full process for using Hypernatural AI as a video generator, from start to finish.
1. Open the video creation tool and start a new project.
2. Choose your input type: an idea, a prompt, a script, or a story.
3. Write a clear video concept. The formula in the next section makes this easy.
4. Select a video style or format if one is offered, and set the aspect ratio for your platform.
5. Review the generated script or scene structure before anything else. This is where most of the quality is won or lost.
6. Choose your voiceover or narration settings, or upload your own audio if you prefer your real voice.
7. Adjust the visuals, the scene order, and the pacing so each scene supports 1 idea.
8. Preview the full video carefully, on a phone if you can, since that is where most people will watch it.
9. Edit the weak scenes and fix any unclear narration before exporting.
10. Export the final video in the right format, after checking the watermark and quality settings.
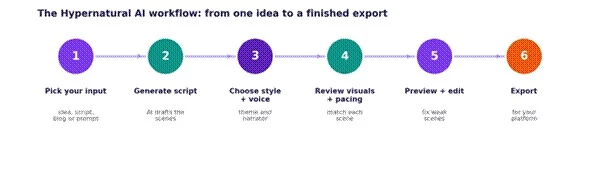
The same 6 stages apply whether you start from an idea, a script, or a blog post.
A beginner idea worth copying "Create a short explainer video for beginners showing how AI tools help small creators turn one idea into multiple pieces of content." |
Why this idea works:
• It names a clear audience: beginners and small creators.
• It states 1 specific topic, not a vague theme.
• It makes a simple promise the video can actually keep.
• It breaks naturally into scenes: the problem, the method, an example, the payoff.
• It fits social media and educational placements equally well.
• It carries 1 main message instead of overloading the viewer.
Hypernatural AI is a text to video AI tool at heart, and like any such tool it rewards a clear creative direction. A one-word topic gives the AI almost nothing to work with, so it fills the gaps with generic choices. A short, structured brief gives it something real to build on.
A simple formula to run every idea through:
Audience + Topic + Goal + Tone + Video Format + Key Points + CTA
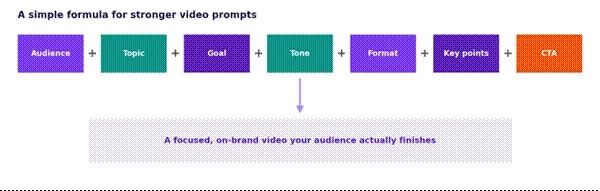
Here is how that formula looks across the video types beginners make most often.
| Video type | Input structure | Example input | Editing tip |
| Beginner explainer | Audience + 1 topic + simple promise | Beginners learning how AI tools save time on content | Slow the pace on the key point |
| Faceless YouTube Short | Hook + 3 quick points + soft CTA | 3 reasons new channels get few views | Sharpen the first 3 seconds |
| Instagram Reel | Vertical + 1 trick + caption + save prompt | 1 trick for faster weeknight dinners | Add bold on-screen captions |
| Product education | Problem + benefit + 1 use case | How a budgeting app helps first-time savers | Show the product in context, not just text |
| Storytelling clip | Arc + warm tone + reflective close | A small bakery that grew by posting daily | Match the music to the mood |
| Marketing awareness | Audience + value + gentle CTA | How a local gym welcomes total beginners | Keep 1 message, not 5 |
| Educational lesson | Concept + 1 example + recap | How compound interest grows savings | Add a short recap scene at the end |
| Motivational short | 1 idea + grounded tone + start-today CTA | A nudge for people starting a side project | Cut anything that feels over the top |
These prompts are written for Hypernatural AI for beginners. Copy any of them, then swap in your own audience, topic, and call to action.
1. Faceless YouTube Short. "Create a 45-second faceless video for new YouTubers explaining 3 reasons their first videos get few views. Keep the tone calm and direct, use short scenes and clear narration, and end with a soft prompt to keep posting."
2. Instagram Reel explainer. "Make a 30-second vertical Reel for home cooks showing 1 simple trick that makes weeknight dinners faster. Use punchy narration, bright visuals, on-screen captions, and a closing line that invites a save."
3. Product awareness video. "Create a 40-second video introducing a budgeting app to first-time savers. Explain the core benefit in plain language, show 3 quick scenes, keep the tone friendly, and end with a gentle invitation to try it."
4. Educational lesson. "Build a 2-minute educational video for students explaining how compound interest grows money over time. Use 1 clear example, simple narration, and a short recap scene at the end."
5. Storytelling video. "Create a 90-second storytelling video about a small bakery that grew by sharing its daily routine online. Use a clear narrative arc, warm visuals, and a reflective closing line."
6. Motivational video. "Make a 30-second motivational video for people starting a side project. Keep it grounded rather than over the top, use 1 strong idea per scene, and end with a simple call to begin today."
7. SaaS feature explainer. "Create a 60-second explainer for a scheduling tool aimed at busy teams. Show the problem, the feature that solves it, and 1 real use case, with clear narration and a short prompt to book a demo."
8. Blog to video. "Turn the main point of a blog post about email marketing for beginners into a 50-second video. Pick 1 angle, summarize 3 tips in short narration lines, and end with a prompt to read the full post."
9. Personal brand video. "Create a 45-second personal brand video for a freelance designer introducing how they approach a new project. Keep the tone confident and human, use clean visuals, and end with a soft invitation to connect."
10. Small business marketing. “Create a 45-second faceless video for small business owners explaining how AI tools can save time in daily marketing. Keep the tone simple and practical. Use short scenes, clear narration, modern visuals, and end with a soft call to action.”
Make any prompt yours Keep the structure and change the variables. Swap the audience, the topic, the length, and the call to action, and you have a fresh prompt in seconds. The clearer the brief, the less editing you will do later. |
A long article rarely becomes 1 good video. It becomes 1 good video about 1 part of the article. The trick is choosing the angle before you paste anything in.
• Pick the core idea first, then ignore the rest of the article for this video.
• Resist turning the whole post into a single clip. It will feel rushed and shapeless.
• Choose 1 angle, 1 audience, and 1 call to action.
• Rewrite long paragraphs as short narration lines, 1 thought per line.
• Structure the video as scenes, not as a wall of text.
• Cut supporting details that do not serve the chosen angle.
• Add a clear hook at the start and a clean ending.
| Blog section | Video scene idea | Narration style | Visual direction |
| Headline and intro | Opening hook | 1 sharp line that names the payoff | Bold title card or a strong first visual |
| The problem section | Problem setup | Short, relatable sentence | Simple, slightly tense visuals |
| Key point 1 | Main explanation | Plain language, 1 idea | A visual that mirrors the point |
| Example or case | Proof point | Concrete example in 1 or 2 lines | Show the example, not a generic clip |
| Summary or tips | Quick takeaway | Tight recap of the main idea | Clean text overlay of the key tip |
| Conclusion | CTA or closing | 1 clear next step | End screen with the prompt to act |
As an AI storytelling video tool, Hypernatural AI gets noticeably better when you think in scenes instead of paragraphs. A scene is 1 idea, with 1 visual and 1 or 2 narration lines. Plan the shape first, then let the tool fill it in. A dependable structure has 6 beats:
• Opening hook that earns attention in the first few seconds.
• Problem setup that names what the viewer struggles with.
• Main explanation that delivers the core idea simply.
• Example or proof point that makes it concrete.
• Quick takeaway that sums up the value.
• CTA or closing line that tells the viewer what to do next.
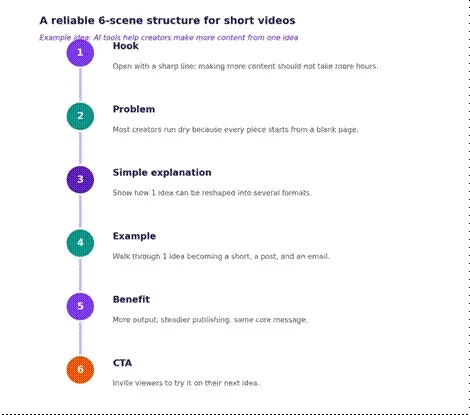
A worked example of the 6-scene structure, built around 1 simple idea.
Small choices in narration, pacing, and visuals separate a video that feels assembled from one that feels intentional.
• Keep narration short and natural.
• Avoid long sentences. If you cannot say a line in 1 breath, split it.
• Use 1 idea per scene.
• Match visuals to the message, not to whatever looks flashy.
• Avoid random stock-style visuals that do not support the script.
• Choose a voice that fits the audience, not just the one that sounds nicest to you.
• Keep videos shorter for Shorts, Reels, and TikTok.
• Preview pronunciation and pacing before export.
• Add captions when the platform is often watched on mute.
| Video goal | Voice style | Visual style | Pacing tip |
| Social hook or Reel | Energetic and clear | Bright, fast, caption-led | Cut hard, skip slow intros |
| Explainer | Calm and confident | Clean visuals matching each line | 1 idea per scene, short narration |
| Educational lesson | Steady and friendly | Simple diagrams or examples | Pause briefly after the key point |
| Storytelling clip | Warm and natural | Cinematic, consistent style | Let quiet moments breathe |
| Marketing or brand | On-brand and human | Brand colors and consistent look | End on the CTA, do not trail off |
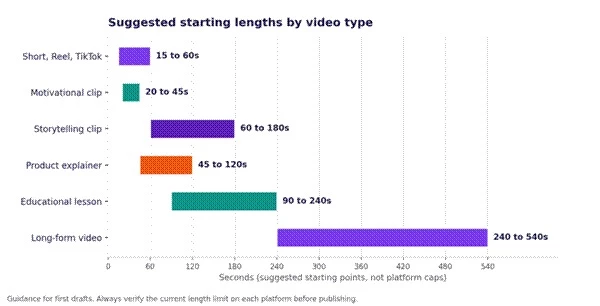
Starting points for first drafts. Always verify the current length limit on each platform before publishing.
As an AI video generator for social media and beyond, Hypernatural AI fits a range of jobs. Match the use case to the right input, format, and review focus.
| Use case | Best input | Best format | Review focus | Success metric |
| Faceless YouTube videos | Script | Wide, 60s and up | Visual relevance and pacing | Watch-through rate |
| YouTube Shorts | Idea or hook | Vertical, 15 to 60s | First 3 seconds | Replays and shares |
| Instagram Reels | Idea and caption | Vertical, 15 to 45s | Captions and hook | Saves and shares |
| TikTok educational clips | Short script | Vertical, 20 to 60s | Clarity of 1 takeaway | Completion and comments |
| Blog to video repurposing | Pasted article angle | Vertical or wide | 1 angle, not the whole post | Click-throughs to the post |
| Product explainers | Script and product info | Wide, 45 to 120s | Accuracy of claims | Demo or signup clicks |
| Course snippets | Lesson script | Wide, 90 to 240s | Correctness and order | Lesson completion |
| Social media campaigns | Brief and key message | Mixed formats | Brand consistency | Reach and engagement |
| Personal brand content | Idea and your angle | Vertical or wide | Tone and authenticity | Follows and replies |
| Internal training videos | Process script | Wide, 60 to 240s | Factual accuracy | Comprehension, fewer questions |
Hypernatural AI is not the only way to make AI videos, and it is not the best pick for every job. A short, honest comparison helps you choose.
| Tool | Better for | Main strength | Main limitation vs Hypernatural |
| InVideo AI | Prompt to full video with heavy automation | Edits the whole video through text commands | Stock-driven visuals can feel less stylized |
| Pictory | Repurposing long content into clips | Turning articles and recordings into videos | Leans on stock footage, fewer generative styles |
| Fliki | Voiceovers and many languages | Large library of AI voices for faceless video | Visuals are simpler and less cinematic |
| Synthesia | Avatar and presenter videos | Realistic talking-head avatars for training | Built around avatars, not faceless story B-roll |
| VEED.io | Hands-on editing with AI assists | Full browser editor with subtitles and tools | More manual, less idea-to-finished automation |
None of these is strictly better. Hypernatural AI tends to win on stylized, story-led short video, while the others lead on stock-based automation, avatars, or manual editing. Pick the one whose strength matches your next video.
A finished export is often close, not final. A short pass in another editor can lift it the rest of the way. You do not need all of these, just the 1 or 2 that fit your workflow.
• CapCut: quick trims, captions, and effects, popular for short-form.
• VEED.io: browser editing with subtitles and easy resizing.
• Canva: simple branding, text, and overlays.
• Premiere Pro: full control for detailed edits.
• DaVinci Resolve: strong color and audio, with a free tier.
• Descript: edit the video by editing its transcript.
• Trimming weak or slow scenes.
• Adding or correcting captions.
• Adding brand colors and fonts.
• Adding music or balancing audio levels.
• Adding a logo, if your plan permits it.
• Replacing visuals that do not fit the script.
• Adding real screenshots or product shots.
• Resizing for different platforms.
• Cutting 1 long video into several short clips.
• Adding a CTA end screen.
After running Hypernatural AI through real projects, here is my honest take. For a beginner who wants to turn ideas, scripts, or stories into short videos without building everything by hand, it is a capable and approachable AI video maker for creators. It is at its best with faceless explainers, educational clips, storytelling videos, and social media content, where assembled scenes and AI narration save real time.
It is not a one-click shortcut to great video, and it does not pretend to be your taste or your facts. The strongest results in this Hypernatural AI guide came from the same habits every time: a clear input, a quick scene plan, a careful look at the visuals, honest fact-checking, and a short edit before publishing. Weak inputs produced weak videos, no matter how good the styles looked.
So treat this AI video creation tool as an assistant, not a replacement for a strong idea, accurate information, or human judgment. Bring those three and it will carry a surprising amount of the rest.
Share your thoughts about this article.
Be the first to post a comment!
LinkedIn users tired of polished posts that say very little now have a new way t...
Vivek Gupta17 hours ago
Quick answerTo rank in Google AI Overviews: first get into the organic top 10 (7...
Deepak Mehra4 days ago
Quick picks (if you just want the answer)Best overall: GPT Image 2 (ChatGPT) — #...
Nitin4 days ago
In 2026, the debate over AI coding assistants has effectively collapsed into a t...
Harpreet Singh4 days ago

Artificial intelligence is beginning to influence entire transportation networks...
Deepak Mehra6 days ago
Quick answerBlackbox AI is an AI coding assistant used for generating code, debu...
Harpreet Singh1 week ago