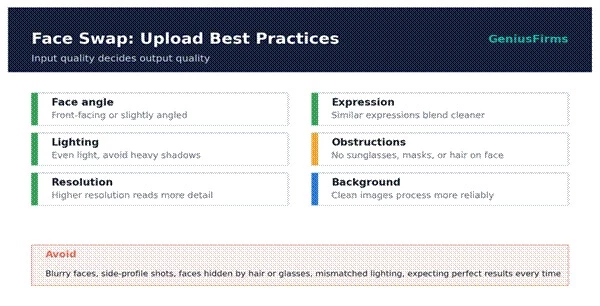
Most disappointing AI edits fail at the upload stage, not the model. A blurry face, a side profile, or harsh shadows will limit any tool, and Remaker AI is no exception. Strong inputs are the real shortcut to clean results.
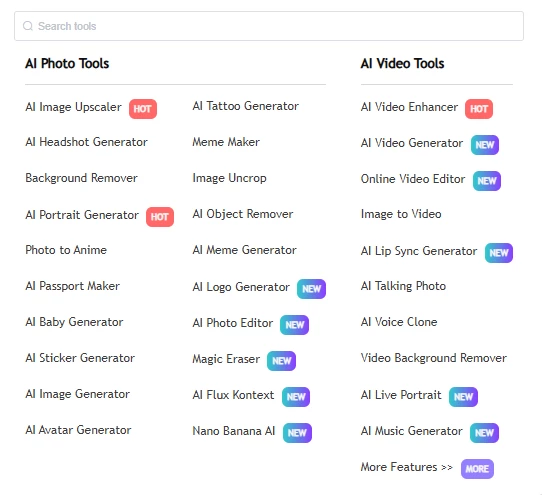
Remaker AI is a browser-based AI editing platform, not only a face swap tool. The same workspace can swap faces in photos and videos, remove backgrounds, upscale low-resolution images, erase unwanted objects, generate images from text prompts, apply photo effects, and turn still images into short videos.
This guide explains the practical steps for using each major Remaker AI tool, along with upload tips, output checks, and safety rules. It avoids overpromising. Outputs vary with input quality, so every result is worth a close review before it is published or shared.
Tool choice should follow the output that is actually needed. The table below maps each Remaker AI tool to its main use and a rough skill level.
| Remaker AI Tool | Main Use | Best For | Skill Level |
| Photo Face Swap | Replace a face in one image | Fun edits, profile concepts, creative visuals | Beginner |
| Multiple Face Swap | Swap faces in group photos | Group edits, posters, memes | Beginner to medium |
| Video Face Swap | Replace a face in videos or GIFs | Short clips, creative video edits | Medium |
| Background Remover | Remove an image background | Product photos, thumbnails, PNG cutouts | Beginner |
| AI Photo Editor | Edit photos with prompts | Background changes, visual corrections | Beginner |
| Image Upscaler | Improve image resolution | Blurry or low-quality images | Beginner |
| Magic Eraser | Remove unwanted objects | Cleanup edits | Beginner |
| AI Image Generator | Create images from prompts | Creative visuals, concepts, thumbnails | Beginner |
| Image to Video | Animate still images | Short creative clips | Beginner to medium |
| Photo Effects | Apply AI styles and effects | Social media visuals | Beginner |
The starting process is the same for every tool. Open the platform, pick the tool that matches the task, upload the file, and review the output before downloading.
Start by choosing the Remaker AI tool that matches the editing task.
1. Visit the official Remaker AI website.
2. Scan the homepage or tool menu.
3. Choose the tool that fits the task.
4. Upload the image or video.
5. Wait for the AI to process the file.
6. Preview the output.
7. Download the result, or regenerate if needed.
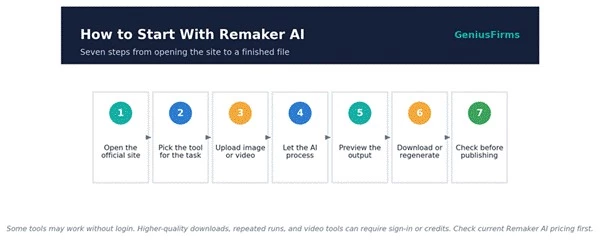
The seven-step flow that applies to every Remaker AI tool.
Each tool sits in its own section of the Remaker AI menu.
Login and pricing Some tools may work free or without login. Higher-quality downloads, repeated generations, video tools, or credits can require sign-in or payment. Current Remaker AI pricing and credit rules should be checked before publishing any result. |
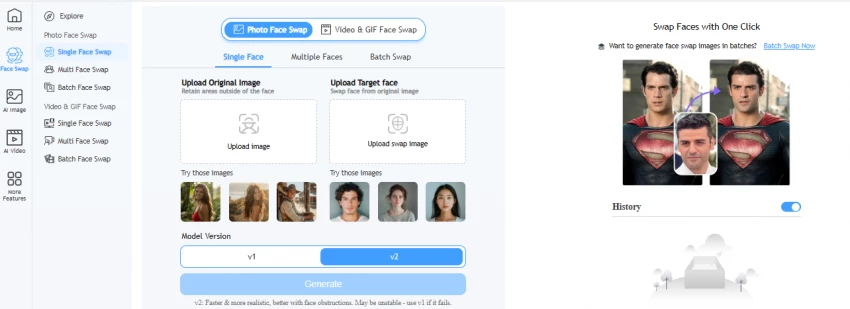
Remaker AI describes its Photo Face Swap as a free online face changer for swapping faces in single images. The workflow is simple, but the quality of both uploaded images decides how natural the swap looks.
1. Open the Photo Face Swap tool.
2. Upload the original image where the face should be replaced.
3. Upload the face image to apply.
4. Confirm both faces are clear and front-facing.
5. Click the face swap or generate button.
6. Wait for processing to finish.
7. Preview the result.
8. Check skin tone, lighting, face angle, and expression.
9. Download the image if it looks natural.
10. Try a different source image if the result looks distorted.
Upload the target image and the face image separately.
Remaker AI also offers a Multiple Face Swap tool that can replace several faces in a single group photo. The extra detection step makes a face-by-face review essential.
1. Open the Multiple Face Swap tool.
2. Upload a group photo.
3. Upload the replacement face images.
4. Select which face should be replaced, if the tool offers selection.
5. Match each replacement face with the correct person.
6. Generate the result.
7. Review every face separately.
8. Download only if all swapped faces look clean.
For group photos, confirm every face before downloading the final image.
| Checkpoint | Why It Matters |
| Face detection | The AI must detect all faces correctly |
| Face matching | Each replacement face should land on the right person |
| Lighting match | Different lighting can make a swap look fake |
| Face size | Very small faces may lose detail |
| Group angle | Side-facing faces may not swap cleanly |
Remaker AI's Video Face Swap supports videos and GIFs. The basic mode handles clips with a single face, while clips with several people may need the dedicated multi-face video mode.
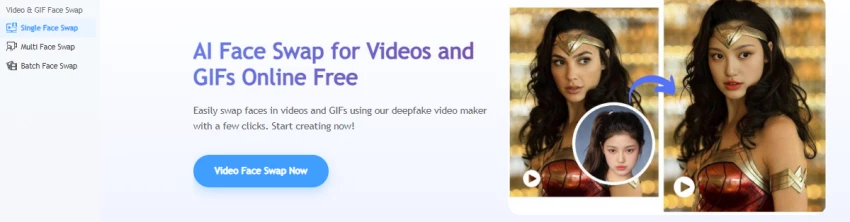
1. Open the Video Face Swap tool.
2. Upload the video or GIF.
3. Upload the face image to apply.
4. Confirm the clip has a clear face.
5. Use single-face mode when only one person appears.
6. Use multi-face mode when several people appear.
7. Start the generation.
8. Wait for processing to finish.
9. Preview the full video, not just the first frame.
10. Check face tracking, blinking, mouth movement, lighting, and motion.
11. Download only if the result stays stable frame by frame.
Start with short videos before running Remaker AI on longer clips.
| Video Factor | Recommended Practice |
| Video length | Start with a short clip first |
| Face visibility | Keep the face visible throughout |
| Movement | Avoid fast head turns for cleaner results |
| Lighting | Stable lighting gives better tracking |
| Multiple faces | Use multi-face mode when available |
| Output review | Watch the full video before publishing |
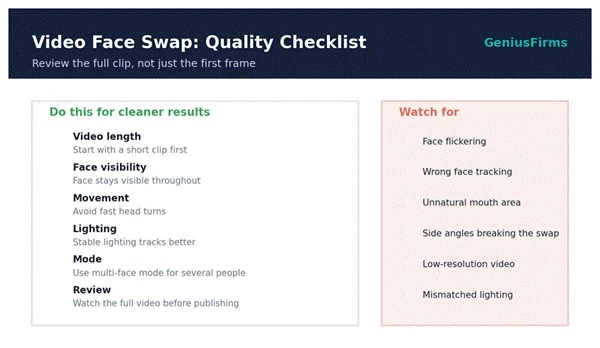
Review the full clip for face tracking, lighting, and expression stability.
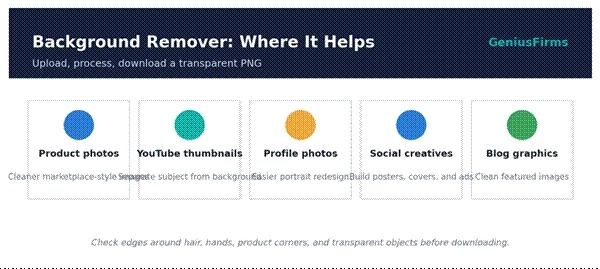
Remaker AI's Background Remover detects the subject, removes the background, and exports a transparent PNG. The official process is short: upload, wait for processing, then download the PNG.
1. Open the Background Remover tool.
2. Upload a JPG, JPEG, or PNG image.
3. Wait for Remaker AI to detect the subject.
4. Preview the transparent background result.
5. Check the edges around hair, product corners, hands, or transparent objects.
6. Download the transparent PNG.
7. Use the PNG in Canva, Photoshop, product listings, thumbnails, or social posts.
The Image Upscaler raises resolution and enlarges low-quality images. It can sharpen detail, but it cannot rebuild information that the original file never captured.
1. Open the Image Upscaler tool.
2. Upload the low-resolution image.
3. Choose the upscale option, if one is offered.
4. Start processing.
5. Compare the original with the upscaled version.
6. Zoom in to check faces, text clarity, edges, and texture.
7. Download the improved image.
Set expectations Upscaling will not fully fix extremely damaged, heavily compressed, or badly blurred photos. It can improve clarity, but it can also invent artificial detail. Faces and text deserve a close check after every upscale. |
Upscaling can improve clarity, but details should be checked closely.
Remaker AI's AI Photo Editor is prompt-based. A text instruction changes part of an image or adjusts the overall visual. Clear, specific prompts produce far better edits than short, vague ones.
1. Open the AI Photo Editor tool.
2. Upload the image.
3. Select the area to edit, if the tool allows masking.
4. Write a clear editing prompt.
5. Click generate or edit.
6. Review the result.
7. Adjust the prompt if the edit looks wrong.
8. Download the final version.
| Goal | Prompt Example |
| Change background | Replace the background with a clean studio backdrop. |
| Improve product image | Make the product photo brighter with a soft shadow. |
| Change clothing color | Change the shirt color to navy blue while keeping the fabric natural. |
| Remove a distraction | Remove the object from the table and keep the background realistic. |
| Social media look | Make this photo look like a clean lifestyle ad. |

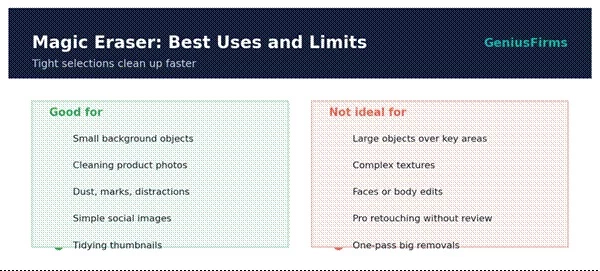
The Magic Eraser, or object removal tool, clears unwanted items from a photo. Tight selections around small objects give the cleanest results.
1. Open the Magic Eraser or object removal tool.
2. Upload the image.
3. Brush over the object to remove.
4. Keep the selection tight around the object.
5. Generate the cleanup.
6. Zoom in and check whether the background looks natural.
7. Repeat the process if the first result looks messy.
8. Download the cleaned image.
The AI Image Generator creates images from text prompts. Detail drives quality, so a prompt that names the subject, setting, style, lighting, and purpose produces more usable output.
1. Open the AI Image Generator tool.
2. Write a detailed prompt.
3. Choose style, size, or model if those options exist.
4. Generate the image.
5. Review the output.
6. Regenerate with a more specific prompt if needed.
7. Download the image.
8. Use it for concepts, blog visuals, social graphics, or creative drafts.

A five-part structure keeps generated images on target.
| Content Type | Prompt Direction |
| Blog image | Clear subject, editorial style, clean composition |
| Product concept | Studio lighting, realistic shadows, simple background |
| Social post | Bold colors, central subject, high contrast |
| Thumbnail | Expressive subject, clear focal point, readable space |
| Creative art | Style, mood, lighting, and camera angle |
Remaker AI's Image to Video tool turns a still image into a short clip by predicting motion and applying transitions. A short motion prompt guides what the movement should look like.
1. Open the Image to Video tool.
2. Upload a still image.
3. Add a motion prompt if the tool supports prompts.
4. Choose video style, duration, or movement option if available.
5. Generate the video.
6. Watch the full output.
7. Check face consistency, motion smoothness, background stability, and distortion.
8. Download the video if it looks usable.
| Goal | Prompt Example |
| Portrait animation | Make the person gently smile and move slightly, keeping the face realistic. |
| Product animation | Add slow camera movement around the product with soft studio lighting. |
| Landscape animation | Add gentle moving clouds and soft cinematic camera motion. |
| Social media clip | Create a short dynamic motion effect suitable for a vertical reel. |

Image-to-video results should be checked for motion smoothness and identity stability.
Photo Effects transform an image into a different style in one step. They suit creative output rather than precise editing, so detail areas need a quick review afterward.
1. Open the Photo Effects section.
2. Upload the image.
3. Choose an effect or style.
4. Generate the result.
5. Compare the style with the original image.
6. Check whether the face, hands, text, or product details changed too much.
7. Download the best version.
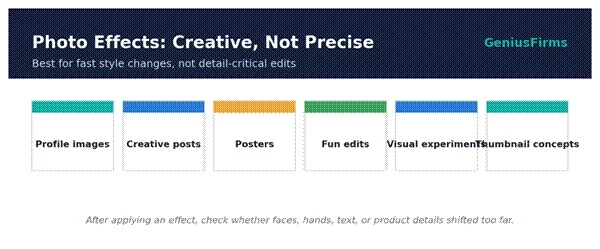
Photo effects are best for creative transformation, not precision editing.
Many real tasks combine two or three tools. The table below pairs common goals with a suggested order of operations.
| Use Case | Best Remaker AI Tools | Suggested Workflow |
| Profile photo edit | Face Swap and Background Remover | Swap the face, remove the background, then enhance if needed |
| Product photo cleanup | Background Remover and Magic Eraser | Remove the background, clear distractions, then upscale |
| Social media thumbnail | Background Remover and AI Photo Editor | Cut the subject, change the background, finish the layout in a design tool |
| Short creative video | Image to Video and Video Face Swap | Animate the image, then apply a face swap if needed |
| Old photo improvement | Image Upscaler and AI Photo Editor | Upscale first, then correct visual issues |
| Group photo edit | Multiple Face Swap | Swap faces and check every person |
| AI concept image | Image Generator and Photo Effects | Generate the base image, then apply a style |
One quick pass through these checkpoints catches most issues before an edit goes live.
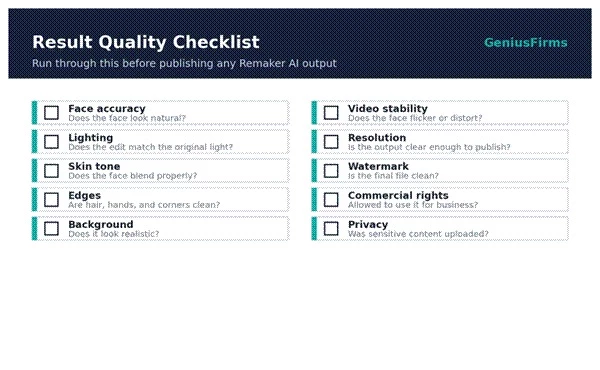
Run every Remaker AI output through these checks before publishing.
Face swap and video face swap are powerful and dual-use. Research on synthetic media has highlighted real risks around unsafe or non-consensual misuse, so these tools call for care.
• Use only personal images or images with clear permission to edit.
• Avoid creating misleading identity-based content.
• Never use face swap for impersonation, scams, harassment, or fake endorsements.
• Never edit a person's face into sensitive or adult content.
• Avoid uploading private or sensitive photos without understanding the privacy policy.
• Label AI-edited media clearly when the context calls for it.
• Check Remaker AI's terms and licensing before any commercial use.
• Never rely on AI face swap for official identity documents.

A simple line between responsible creative use and harmful misuse.
Most problems trace back to the input file or the prompt. The table below maps each symptom to a likely cause and a quick fix.
| Problem | Possible Reason | Fix |
| Face swap looks fake | Different angle or lighting | Use a clearer, better-matched face image |
| Video face flickers | Fast motion or low-quality video | Use a shorter, clearer clip |
| Background removal cuts hair badly | Complex background | Use a higher-contrast image |
| Upscaled image looks artificial | Original image too damaged | Try a better source image |
| AI editor ignores the prompt | Prompt too vague | Add a specific action, object, and style |
| Object remover leaves marks | Object too large | Remove in smaller sections |
| Image generator output is random | Prompt lacks detail | Add subject, style, lighting, and purpose |
| Download quality is low | Free or credit limitation | Check export or pricing rules |
Remaker AI earns its place for quick face swaps, background removal, image cleanup, upscaling, AI image generation, and short creative video edits. It performs best when the source file is clear and every output is reviewed before it is published.
It should not be treated as a flawless professional editor. Face swaps, video edits, and generated images can still produce errors. The reliable path is steady: start with high-quality files, write clear prompts, review every output, and follow the responsible-use rules above.
Share your thoughts about this article.
Be the first to post a comment!

AI assistants stopped being optional somewhere in the last two years. Four in fi...
Harpreet Singh5 days ago
In shortAI text is fast, but it usually reads like a machine: even sentence leng...
Harpreet Singh1 week ago

Buying an AI tool after reading one polished review can be risky. Some reviews r...
Michael Hicklen1 month ago
Creating a first AI video clip sounds simple until the output comes back with th...
Mighva Verma1 month ago

Choosing an AI tool sounds simple until the options start looking the same. One...
Deepak Mehra1 month ago

Gauth AI tends to matter most at the exact moment it stops cooperating. A proble...
Mighva Verma1 month ago